
Hey there, holiday baking enthusiasts! If you’re like me, then you love adding a touch of fun and festivity to your sweet treats during the Christmas season. Rudolph the Red-Nosed Reindeer has become an iconic symbol of Christmas joy, and what better way to celebrate than with adorable Rudolph reindeer cookies? Today, I’m going to walk you through a comprehensive, step-by-step guide to creating these lovable holiday cookies, with plenty of tips and tricks to make your baking process smooth and your cookies irresistible. So, grab your ingredients, and let’s get started on making the cutest Rudolph cookies ever!
What Are Rudolph Reindeer Cookies?
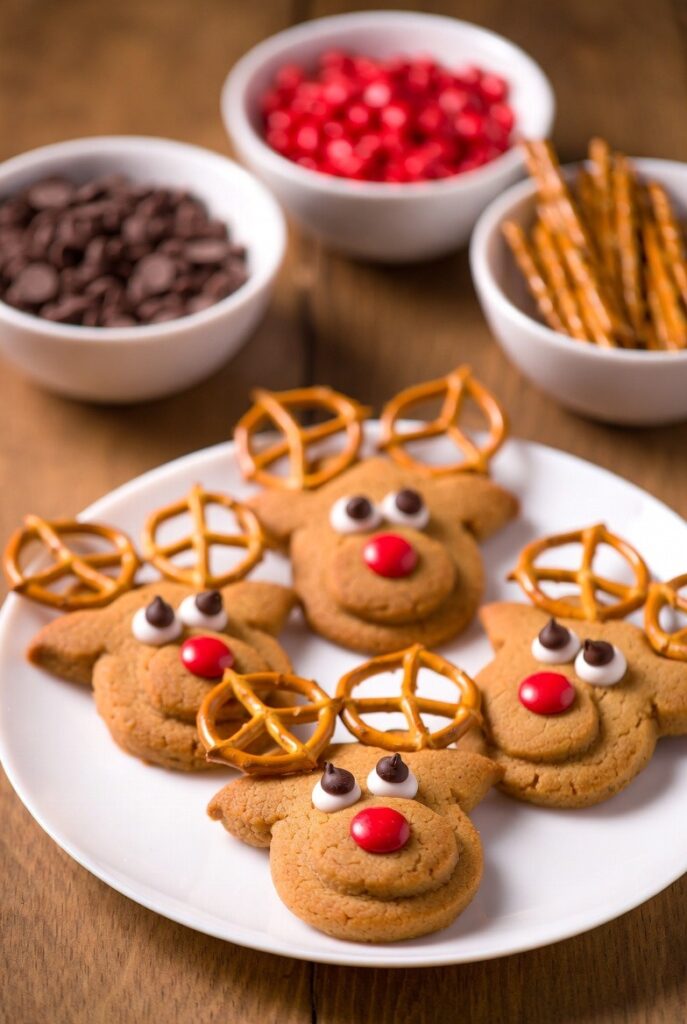
These cookies are festive, sugar-based treats shaped and decorated to resemble Rudolph the Reindeer. Usually made with sugar cookies or gingerbread, they feature a distinctive red nose, expressive eyes, and sometimes antlers, making them perfect for Christmas parties, cookie exchanges, or just a fun holiday baking project with family and friends.
Key Elements of Rudolph Cookies:
- Soft, flavorful base cookie (sugar or gingerbread)
- Red nose (typically a candy or icing)
- Eyes (chocolate chips, candies, or icing)
- Optional antlers (chocolate or pretzel sticks)
- Festive decorations (icing, sprinkles)
Why Make Rudolph Reindeer Cookies?
Besides being adorable, these cookies are a fantastic way to engage children and loved ones in holiday baking. They also make charming gifts, party favors, and Christmas dessert table stars. Plus, customizing Rudolph with different facial expressions or adding extra decorations makes every batch unique and personal.
Materials Needed: Everything You Need to Create Rudolph Cookies
Here’s a detailed table of the essential materials, ensuring you won’t miss a thing in your baking adventure.
| Material Type | Specific Items | Details / Tips |
|---|---|---|
| Flour | Unbleached all-purpose flour | 2 ½ cups (about 300g) — for sturdy yet tender cookies |
| Sugar | Granulated sugar | 1 cup (200g) — adds sweetness and helps with browning |
| Butter | Unsalted, softened | ¾ cup (169g) — for flavor and texture |
| Eggs | Large eggs | 1 large egg — binds the dough |
| Vanilla Extract | Pure vanilla extract | 1 teaspoon — adds warmth and depth of flavor |
| Baking Powder | Baking soda or baking powder | 1 teaspoon — for rise and soft texture |
| Salt | Fine sea salt | ¼ teaspoon — enhances flavor |
| Red Candy or Icing | Red gumdrops, red M&Ms, or red icing gel | For Rudolph’s nose, bright and festive look |
| Chocolate Chips or Candies | Mini chocolate chips, brown candies, or frosting | For eyes and additional facial features |
| Optional Decorations | Pretzel sticks, chocolate wafers, sprinkles | For antlers, facial detailing, and extra flair |
| Tools | Cookie cutters (round, reindeer shape), piping bags, toothpicks, small brush | To shape, decorate, and detail your cookies |

Step-by-Step Process: How to Make Rudolph Reindeer Cookies
1. Prepare Your Workspace and Ingredients
Start by gathering all your materials. Clear your workspace, and make sure your ingredients are measured and ready to go. This speeds up the process and keeps your baking organized.
2. Make the Cookie Dough
- Cream the butter and sugar: Using a mixer, beat the softened butter and sugar until light and fluffy, about 2-3 minutes.
- Add eggs and vanilla: Mix in the egg and vanilla extract until well combined.
- Combine dry ingredients: In a separate bowl, whisk together flour, baking powder, and salt.
- Mix the dough: Gradually add the dry mixture to the wet ingredients, mixing on low speed until a dough forms.
- Chill the dough: Wrap with plastic wrap, flatten into a disc, and refrigerate for at least 30 minutes. This step is crucial for easy rolling and shape retention.
3. Roll and Cut Cookies
- Preheat oven: To 350°F (175°C).
- Roll the dough: Lightly flour your surface and rolling pin. Roll the dough to about ¼-inch thickness.
- Cut out shapes: Use reindeer-shaped or round cookie cutters. For a uniform look, chill the cutouts for 10 minutes before baking.
4. Bake and Cool
- Bake cookies: Line baking sheets with parchment paper. Place cutouts on sheets, leaving space for spreading. Bake for 8-10 minutes or until edges are lightly golden.
- Cool down: Remove from oven and let cookies cool on a wire rack completely before decorating. This prevents smudging and melting decorations.
5. Decorate Rudolph’s Face
Now comes the fun part! Here’s how to add those adorable Rudolph features:
- Attach the nose: Place a small dab of icing or edible glue on the center of each cookie. Stick a red gumdrop or red M&M for Rudolph’s nose.
- Create eyes: Use mini chocolate chips, candies, or piped icing to make expressive eyes. Position them slightly above the nose for a cute face.
- Add antlers (optional): Break pretzel sticks into smaller pieces. Attach with icing on top of the cookies to mimic antlers.
- Additional details: Use a fine-tipped piping bag to add a mouth or eyebrows for personality.
6. Set and Serve
Allow the decorations to set for about 30 minutes at room temperature. Store in an airtight container if not serving immediately.
Tips for Success
- Chill your dough thoroughly: The longer you refrigerate, the easier it is to cut, and cookies will hold their shape better.
- Use high-quality ingredients: Fresh butter and pure vanilla enhance flavor.
- Decorate with precision: Use a toothpick or small brush for delicate details.
- Get creative: Add glitter, sprinkles, or edible metallic accents for extra festivity.
- Practice patience: Allow icing and decorations to set fully to prevent smudging.
Common Mistakes and How to Avoid Them
| Mistake | Solution |
|---|---|
| Overworking the dough | Mix just until ingredients are combined; overmixing makes cookies tough. |
| Not chilling the dough enough | Chill for at least 30 mins; this prevents spreading and maintains shape. |
| Underbaking or overbaking | Keep an eye on oven time; cookies should be lightly golden around edges. |
| Decorating too early or rushes | Let cookies completely cool before decorating; decorations will adhere better. |
| Using too much icing or candies | Use sparingly for a neat look; too much can make decorations heavy and messy. |
Variations and Customizations to Try
- Gingerbread Rudolphs: Replace sugar cookies with spicy gingerbread cookies for added flavor.
- Mini Rudolph Cookies: Make smaller versions for bite-sized treats or cookie exchanges.
- Different Facial Expressions: Play with eyes, mouths, and antlers for cheerful, surprised, or silly looks.
- Themed Accessories: Add Christmas hats, scarves, or sweaters using fondant or colored icing.
- Alternative noses: Use edible glitter or themed candies like peppermint for variety.

Summary: Make Your Holidays Special with Rudolph Cookies
Creating Rudolph reindeer cookies isn’t just about baking; it’s about adding joy, personality, and a festive spirit to your holiday celebrations. With the right ingredients, careful steps, and a splash of creativity, you can craft delightful cookies that will impress family and friends alike. Remember, patience and practice make perfect. So, gather your materials, follow these steps, and bring some Rudolph magic to your holiday table!
Whether you’re baking for a Christmas party, family gathering, or just to treat yourself, these adorable Rudolph cookies are sure to brighten the season. Happy baking!
Enjoy making and sharing these charming holiday treats!