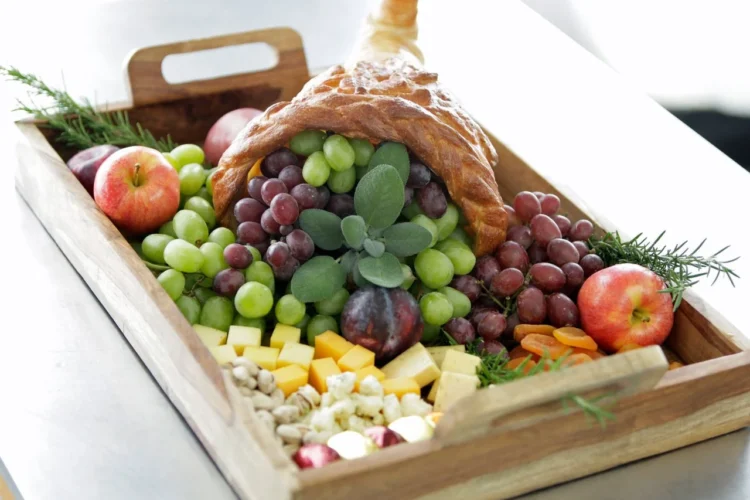
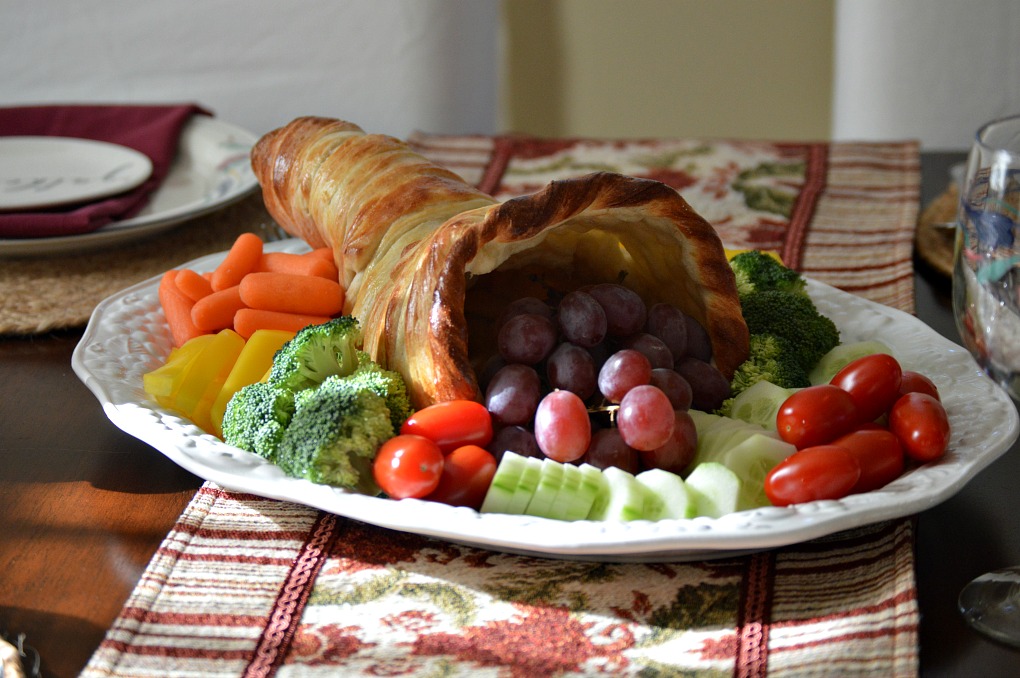
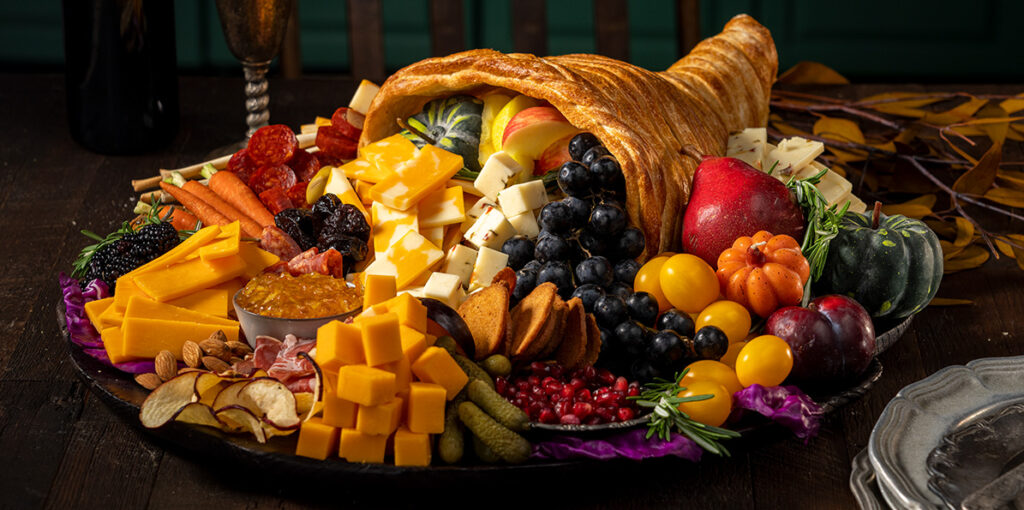
Hey friends! Are you gearing up for Thanksgiving and want to impress your guests with a show-stopping centerpiece? Well, nothing beats the charm and bounty of a traditional Thanksgiving Cornucopia. Not only is it eye-catching, but it also celebrates the fall harvest with a colorful medley of fruits, vegetables, nuts, and grains. Today, I’ll walk you through a comprehensive guide on making an Instagram-worthy, delicious Thanksgiving Cornucopia, filled with tips, tricks, and essential steps to ensure your creation turns out perfect.
What Is a Thanksgiving Cornucopia?
Let’s start with a quick definition.
Definition:
| Term | Explanation |
|---|---|
| Cornucopia | A horn-shaped basket or container overflowing with a variety of produce and other harvest items, symbolizing abundance and gratitude during Thanksgiving. |
In simple terms, a cornucopia is a decorative, horn-shaped basket packed with seasonal produce, nuts, and grains, representing plentiful harvest and gratitude.
Why Make a Cornucopia for Thanksgiving?
Creating a cornucopia is more than just a beautiful decoration; it’s a way to:
- Showcase seasonal bounty.
- Add a festive, rustic touch to your table.
- Serve as an interactive centerpiece for guests to explore.
- Celebrate the abundance of Thanksgiving with vibrant, fresh ingredients.
Materials Needed for a Thanksgiving Cornucopia
Before diving into the step-by-step process, let’s gather everything needed. Here’s a detailed table to help you prepare efficiently:
| Materials | Quantity / Details | Purpose/Notes |
|---|---|---|
| Cornucopia Basket or Horn-Shaped Container | 1 large (preferably woven wicker or natural fiber) | Main holding vessel, traditional shape |
| Faux or Fresh Vegetables | 10-15 assorted (see list below) | Fill the basket, add colors |
| Fresh Fruits | 8-12 pieces (apples, pears, grapes, pomegranates) | Bounty and vibrancy |
| Nuts & Grains | Small bowls or handfuls (walnuts, acorns, wheat stalks) | Texture and richness |
| Seasonal Leaves & Foliage | Assorted fall leaves, branches, berries | For filling gaps and decoration |
| Decorative Items | Mini pumpkins, gourds, corn husks | Add holiday charm |
| Floral Picks or Floral Foam | Optional, for arranging smaller items | To stabilize and arrange comfortably |
Step-by-Step Guide to Making a Thanksgiving Cornucopia
Now, let’s walk through the process, making sure each step is clear and straightforward. I promise, you’ll create a centerpiece that looks as good as it tastes!
Step 1: Prepare Your Workspace and Materials
- Clear a large, flat surface.
- Gather all your materials.
- Have scissors, glue gun, floral tape, and wire handy.
Step 2: Select and Prepare Your Container
- Choose a sturdy cornucopia basket or horn-shaped vessel.
- If using a faux basket, ensure it’s clean and dry.
- Line the interior with floral foam or tissue paper if you need support for arranging smaller items.
Step 3: Start with a Foliage Base
- Fill the bottom of the basket with fall leaves, moss, and branches.
- This creates a natural foundation and hides the edges of the container.
Step 4: Arrange Larger Items First
- Place larger fruits and vegetables symmetrically, approximately at the base and towards the opening.
- Use sturdy items like pumpkins, gourds, or large apples to give the structure stability.
- Position them slightly at an angle, mimicking abundance spilling out.
Step 5: Fill in with Smaller Items
- Add clusters of grapes, pomegranates, or small gourds.
- Tuck nuts and grains among the larger elements.
- Use floral picks or wire to secure items if needed.
Step 6: Add Decorative Touches
- Integrate seasonal elements like wheat stalks, acorns, miniature gourds, or even fairy lights.
- Balance colors by spreading reds, oranges, yellows, and greens throughout.
- Place some items spilling over the edges to create a dynamic, overflowing look.
Step 7: Final Adjustments and Touch-Ups
- Step back and assess symmetry.
- Fill any gaps with additional foliage or tiny decorations.
- Make sure heavier items are securely positioned to prevent tipping.
Tips for a Perfect Cornucopia
- Use fresh, seasonal produce: It not only looks good but also tastes great if guests decide to nibble.
- Balance colors and textures: The more varied, the more eye-catching.
- Secure loose items: Floral wire or picks help keep everything in place.
- Layer items naturally: Avoid overly symmetrical arrangements; a natural spill-over effect is most attractive.
- Incorporate height: Stack some items higher or use floral foam to add dimension.
Common Mistakes and How to Avoid Them
| Mistake | How to Prevent It |
|---|---|
| Overstuffing the basket | Keep balance; don’t overfill, or it might topple |
| Using all artificial items | Mix fresh and faux for authenticity and longevity |
| Ignoring safety | Make sure items are secured to prevent falls or accidents |
| Neglecting color balance | Place reds, yellows, and greens evenly for vibrancy |
| Forgetting the base | Start with a foliage or moss foundation for a natural look |
Variations to Elevate Your Cornucopia Game
Looking to put a unique spin on the classic? Here are some fun variations:
- Vegan Cornucopia: Replace all animal-derived items with colorful vegetables like carrots, radishes, and peppers.
- Sweet Cornucopia: Focus mainly on fruits, candy corn, and nuts for a dessert-inspired centerpiece.
- Mini Cornucopias: Create smaller individual versions for each guest using mini baskets or cups.
- Themed Cornucopia: Incorporate specific colors, such as metallics or seasonal motifs (e.g., Halloween or Christmas).
Wrapping It All Up
Creating a Thanksgiving Cornucopia isn’t just about decoration; it’s a heartfelt celebration of gratitude and abundance. Gather your seasonal produce, find a beautiful container, and let your creativity flow. Whether you opt for classic fall colors or give it a fun, modern twist, your cornucopia will undoubtedly be a conversation starter and a feast for the eyes.
So, get ready to craft a centerpiece that captures the spirit of Thanksgiving — bountiful, beautiful, and full of warmth. Happy decorating, friends! And remember, the most important ingredient is the joy you put into your creation.
Happy Thanksgiving!